Managing Permits in the CSS Portal
Permit Technicians
Johns Creek, GA 30097
- Following Your Permit’s Progress
- Pay Fee Invoices
- Plan Review – Re-Submittal Required
- Plan Review – Plans Approved
- Permit Issued
- Print Your Permit Documents
- Inspections
- Revisions to Approved Plans
- Change of Contractor
- Permit Extensions and Renewals
- Certificate of Occupancy
- Certificate of Completion
Following Your Permit’s Progress
Any Contact related to a permit may log into the CSS Customer Self-Service Portal to view the permit’s progress. Only the Applicant submits plans and documents during the application and review steps.
In the CSS Portal, the Dashboard shows your permits, invoices due, and inspections.
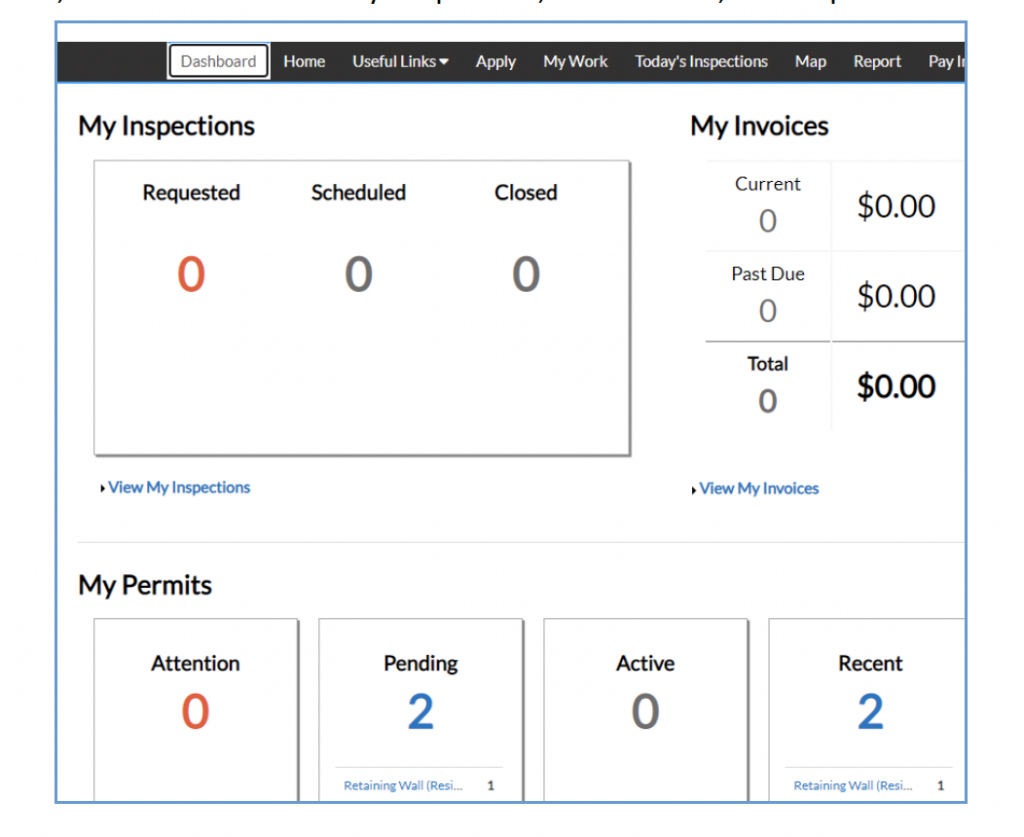
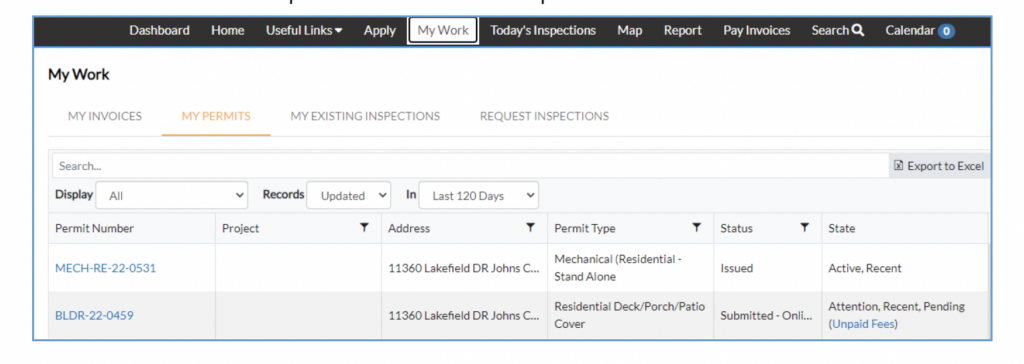
Click onView My Permits to see the permits associated with the logged-in CSS user, listed in the My Work tab. Click on the blue permit number to view the permit record.
The permit opens on the Summary tab, which shows the progress of the Workflow steps and anything that requires your attention (red exclamation point symbols). Click on the blue buttons to go directly to that action.
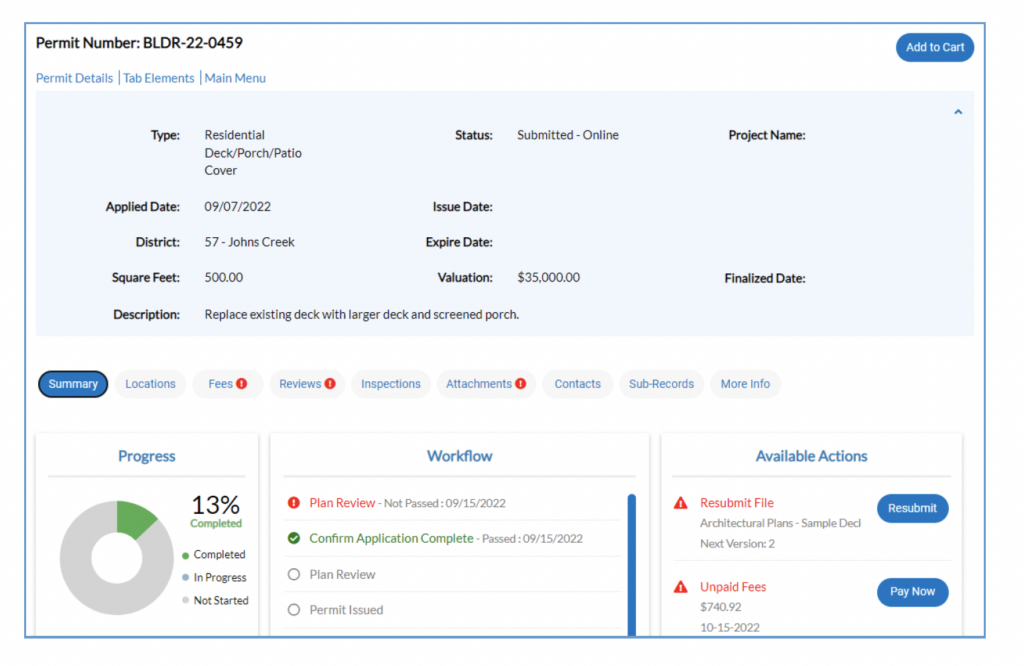
Each tab shows details about the permit:

Pay Fee Invoices
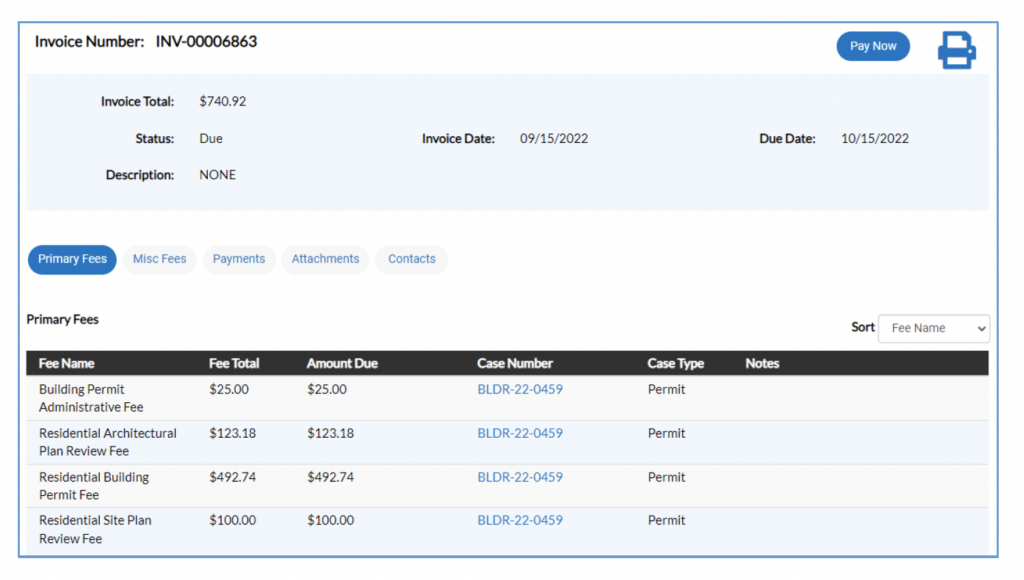
Anyone can pay fee invoices via the CSS Portal if they have the Invoice Number. Click on the blue Pay Now button or the Add to Cart button to begin the payment process. An invoice must be paid in full (no partial payments). Multiple invoices may be paid at once.
Fees must be paid in full before plans will be reviewed or permit will be issued. Re-Inspection fees must be paid before the next inspection may be scheduled.
You can print the invoice and the payment receipt by clicking on the print icon.
Plan Review – Re-Submittal Required
When a review of submitted plans is complete and re-submittal is required, a notification is sent to the Applicant. On the CSS Portal, you’ll also see notifications on your Dashboard and the My Work tab, as well as in the permit’s Reviews tab and Summary tabs.
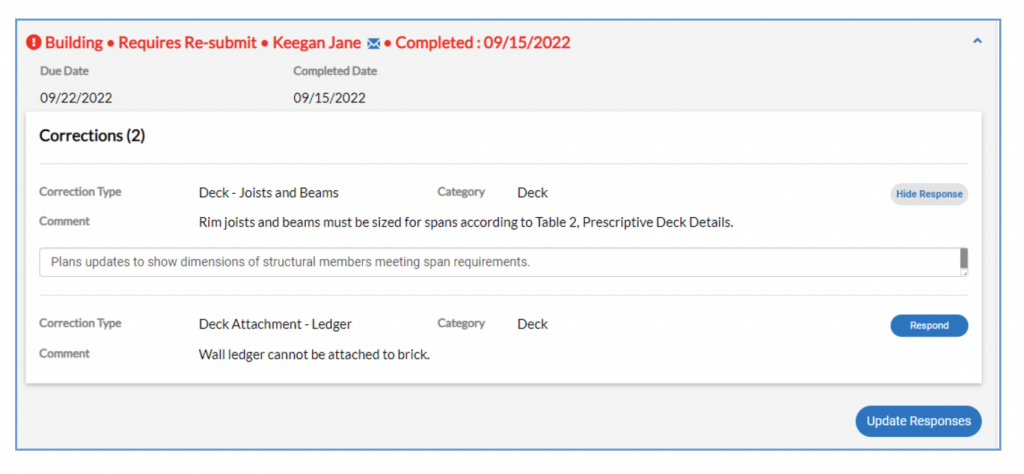
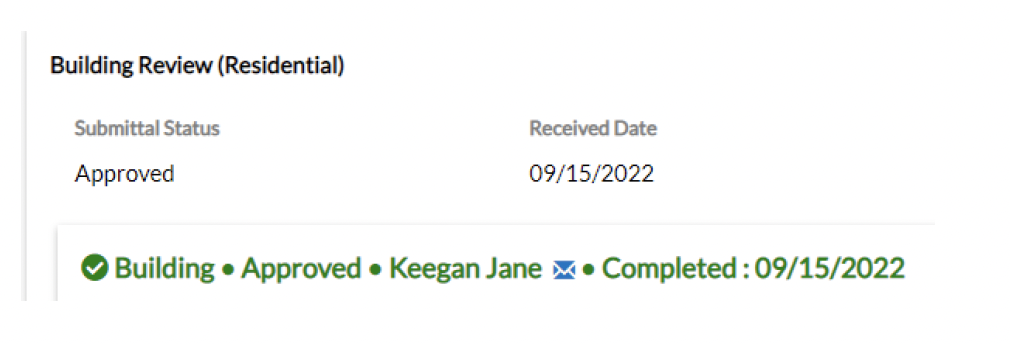
Open your permit to view Correction Comments in the permit’s Reviews tab. Each review type will have a section showing the type of review (Building, Planning & Zoning, Land Management, and/or Fire Marshal). The review result is shown as “Approved” (green) or “Requires Re-submit” (red). Click the email icon (blue envelope) to email the reviewer directly with any questions about the correction comments.
Click on the down arrow to expand the review section and view the correction comments.

Written responses to each comment may be entered by clicking the blue Respond button, and then clicking the blue Update Responses button when finished. Alternatively, a separate response letter may be uploaded as a Related Document.
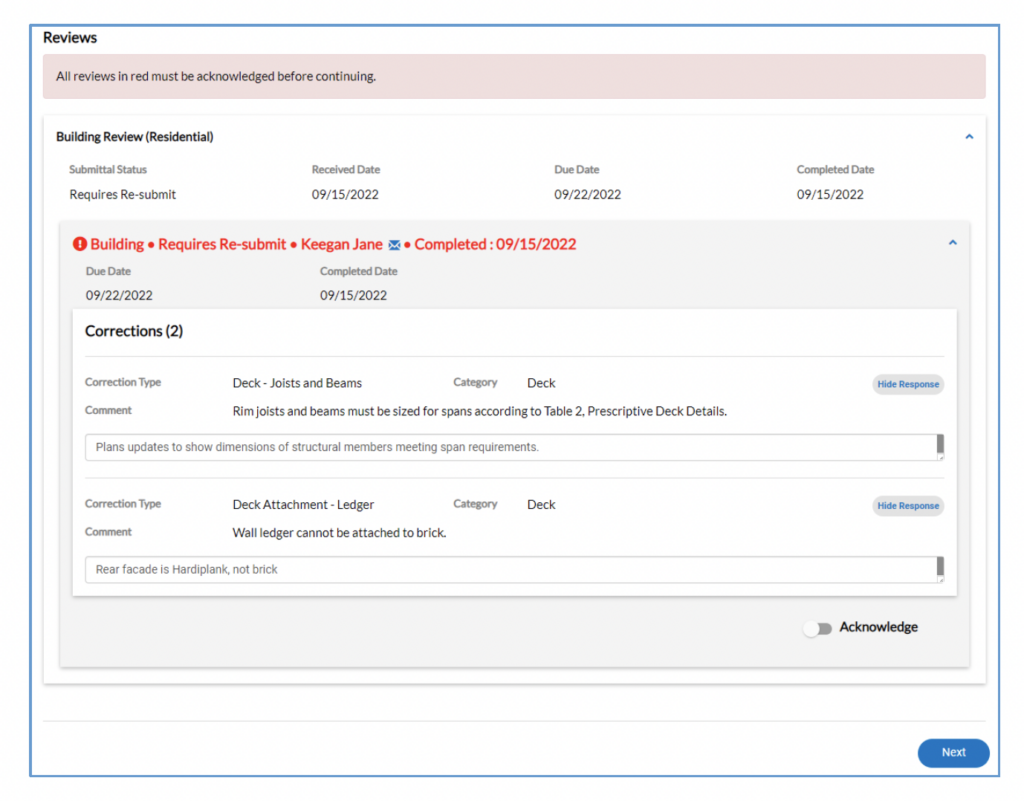
Before you can upload files, correction comments must be acknowledged (whether or not you entered responses to individual comments). Toggle on the Acknowledge button, then click Next.
In the Attachments tab, files you’ll need to update and re-submit are indicated with the red circle (with exclamation point). A yellow triangle just means the file needs your attention.
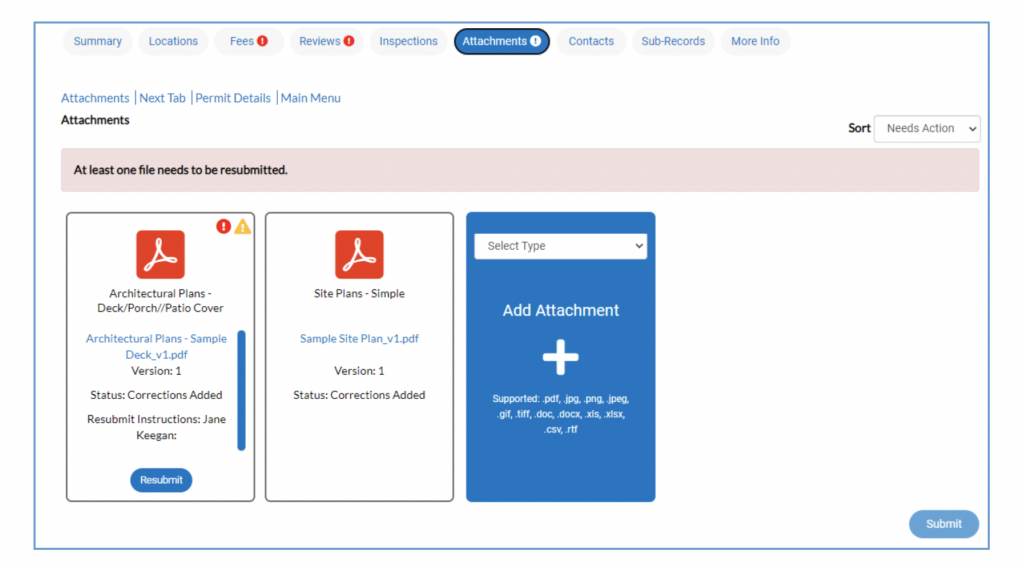
First, handle each file required for re-submittal. Click on the blue Resubmit button to upload a new (corrected) version of the file.
Please follow these instructions:
▪ Cloud your revisions on the plan.
▪ Update the plan index on the cover sheet, clouding any sheets that have been revised.
▪ Add a revision date to the cover sheet and and to any sheets on which you’ve made changes.
▪ Add the permit number and file category as a prefix to your own file name.
▪ Upload your file to the correct category. It will become the new version of the previous file.
▪ Submit PDF files, with all security features removed.
Click the blue Select File button, choose the file you want to upload from your computer, and add it.
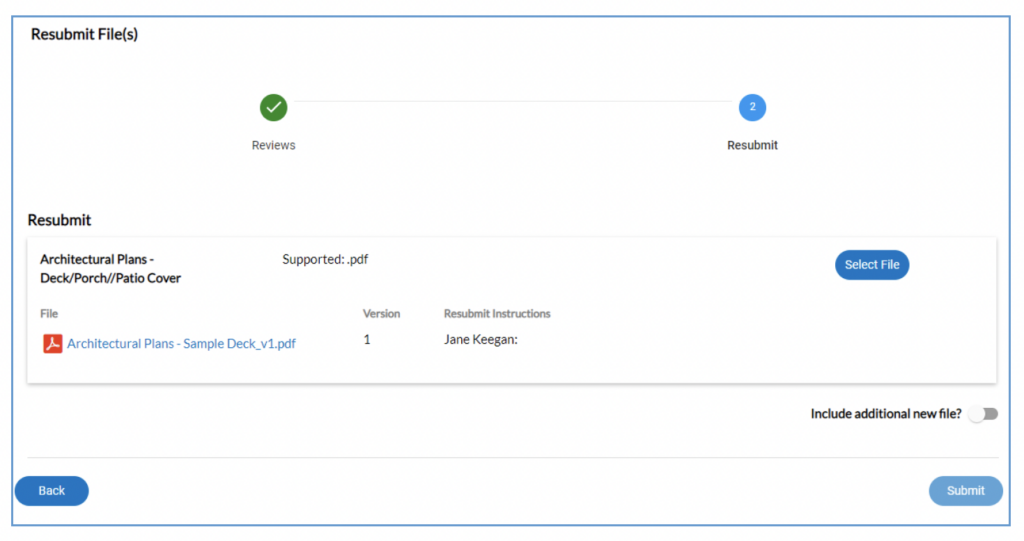
Re-submitted files should be named with the permit number and file category as the prefix. For example, BLDR-22-0322 -Architectural Plans -Sample Deck – Revised 9-15-22. The new file will become v2 of the original v1 (version #1).
Additional documents may be requested by the reviewers, or you may want to add some relevant information. Toggle on the Include additional new file button. Then click Submit.
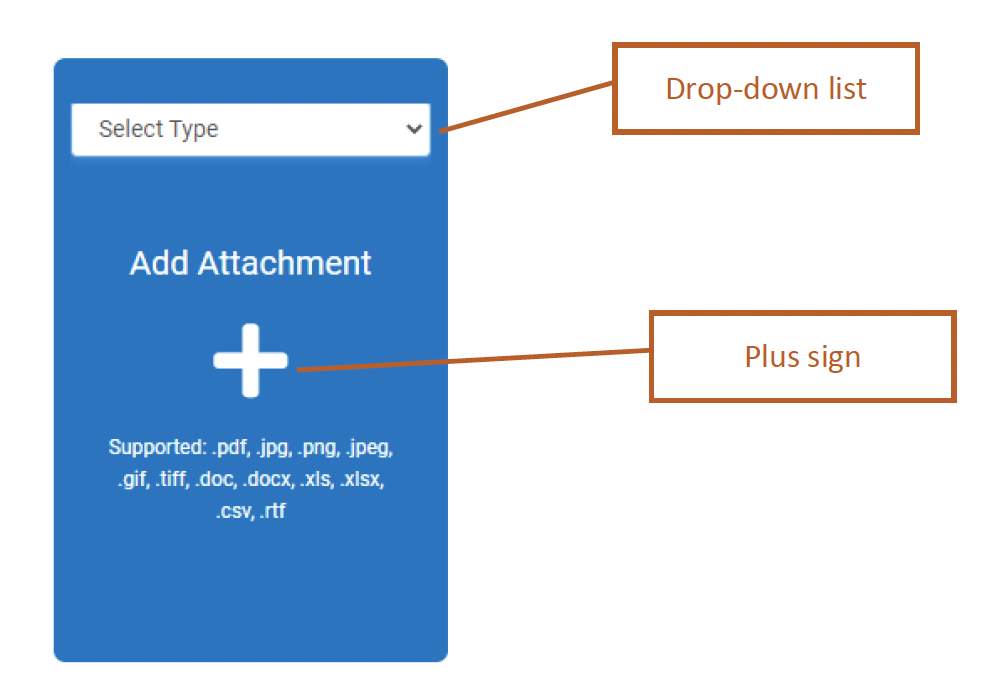
Click Add Attachment card and select the file category from the drop-down list.
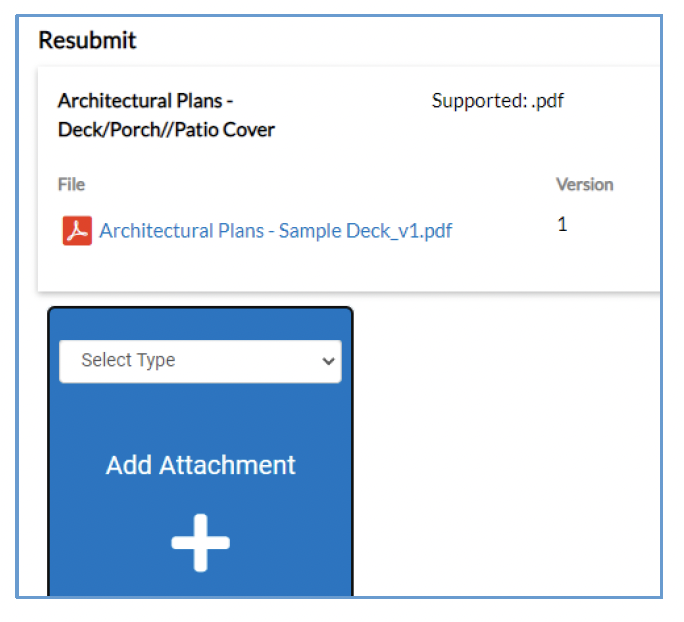
File Upload Notes:
▪ Select the type from the drop-down list on the blue card.
▪ Click the + symbol to upload a file.
▪ Upload files individually.
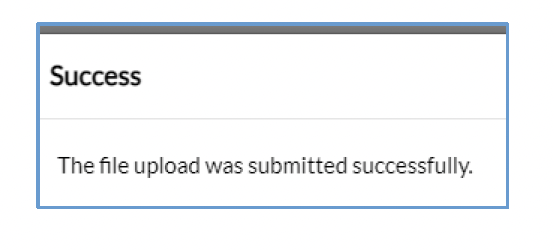
Click Submit to complete the re-submittal. Do not close your browser until all files have been uploaded successfully and you see the message:
The new files will be routed to the reviewers who had corrections comments. If there are further Correction Comments in the next round of reviews, any previous comments that were addressed in the re-submittal will be crossed out.

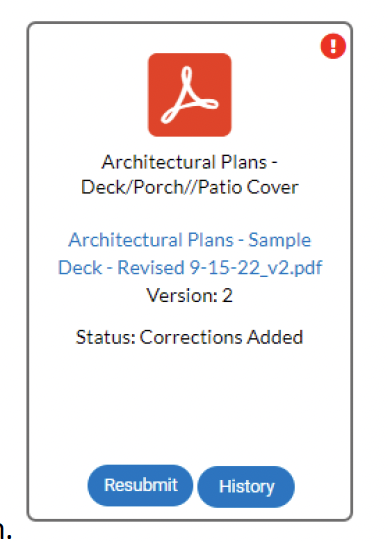
You may view the file’s history by clicking on the blue History button.

All versions of the file uploaded will be listed.
Plan Review – Plans Approved
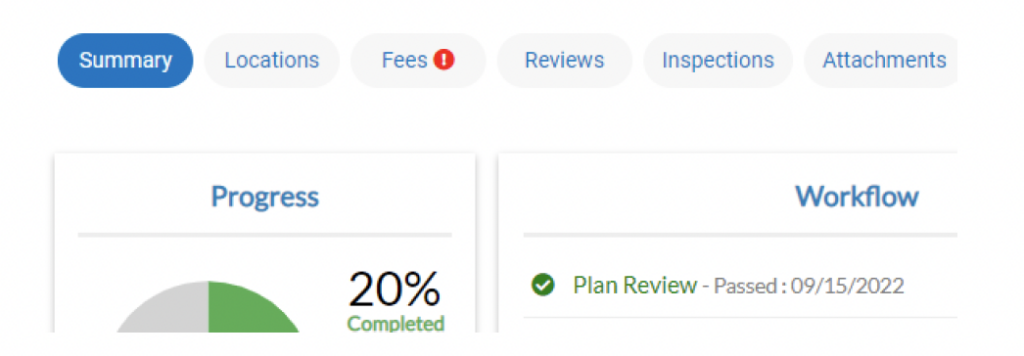
When all reviewers have approved your plans, you’ll see that Plan Review is Passed on the Summary tab.
You’ll also see that the reviews are approved on the Reviews tab.
You may not begin work until the permit is issued, even if the plans are approved. The Permit Techs will verify that all fees are paid, that contractor license are current, stamp the plans, and then issue the permit.
Permit Issued
When the permit is issued, you will see the new Status on the Summary tab is Issued. The Workflow will show Permit Issued in green, with the date issued.
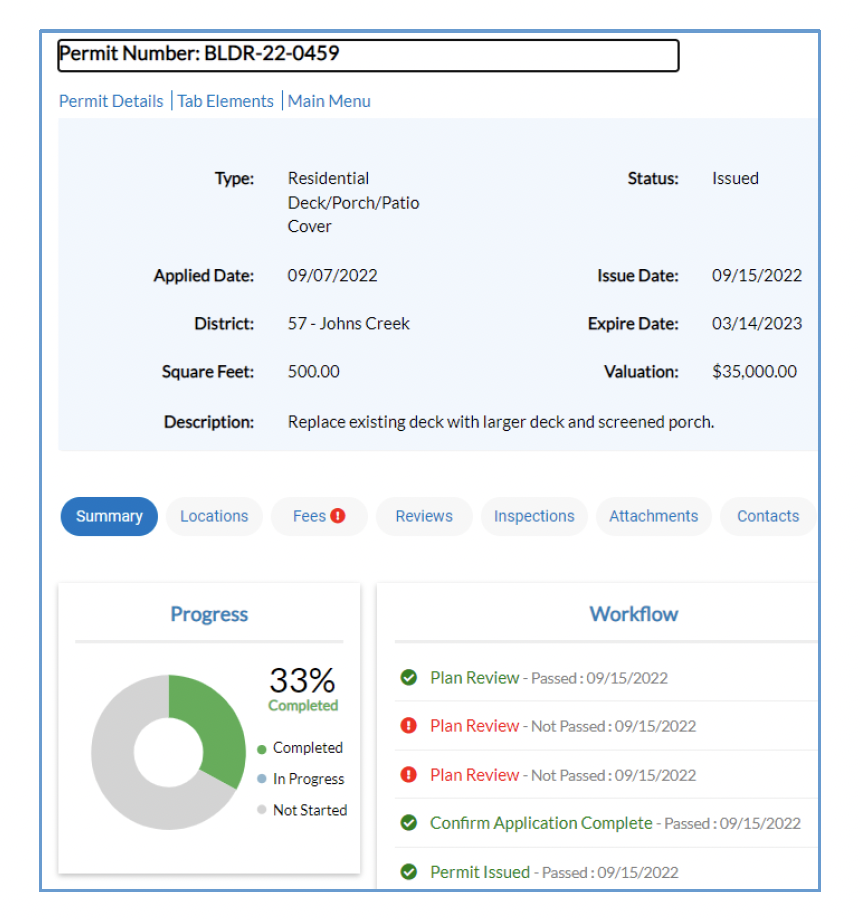
Permits are valid for 180 days from the date of issuance, or 180 days from the date on which the latest Building inspection was passed. When a permit’s status is Expired, inspections cannot be scheduled. If work proceeds under an expired permit, a Stop Work Order may be issued. See the section below for information about requesting Permit Extensions and Renewals.
Print Your Permit Documents
The Applicant will be notified by email when the permit has been approved and issued. The next step is to log into the CSS Portal and print out the permit and the approved plans.
In the Attachments tab, the final approved plans are renamed as:
Permit Number + File Category + Approved + Date
Download and print each Approved file in full size. Do not shrink plans to fit a smaller sheet size, as plans will become illegible. Approved plans and documents make up the Job Copy set.
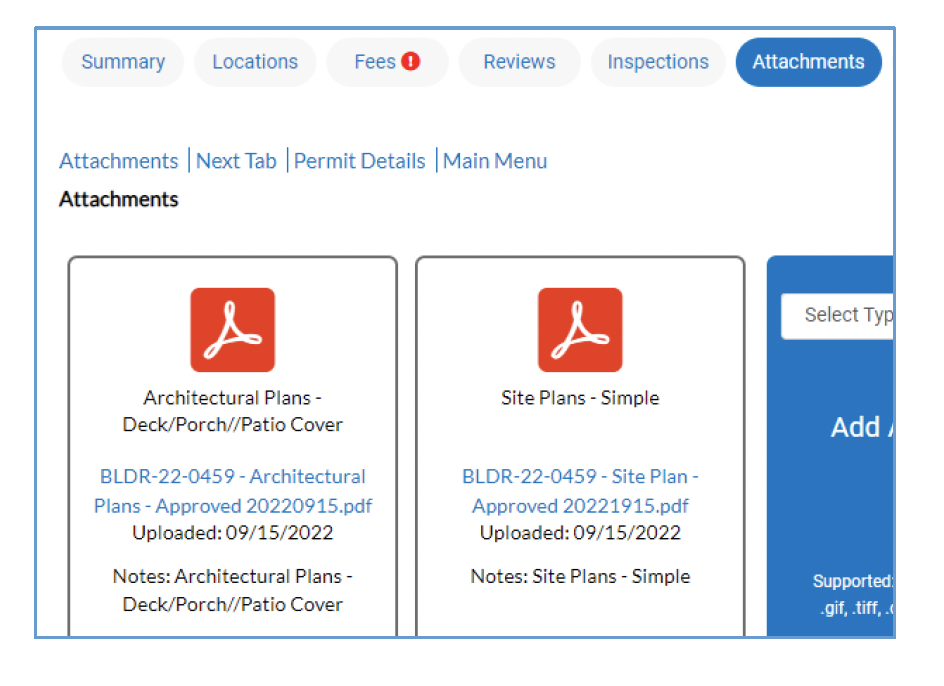
Post Permits (building and trade) on the job site in a protected place, visible from the street. The Job Copy of the approved plans and documents which must be on the job site, available to the inspector.
Inspections
Inspection Policies
Request Building inspections, Site inspections, and Fire Marshal inspections for building and trade permits on the CSS Portal.
Work must not be covered up or progress until it passes required inspections.
▪ Required Inspections: Each permit requires inspections based on the scope and nature of the work performed. The inspection list is shown on the permit in the CSS Portal. You must schedule and pass ALL required inspections. If you think a required inspection is not applicable to your project, call the Permit Techs at 678/512-3250 to discuss.
▪ Who Should Request: Inspections are requested by the licensed contractor, who is responsible for ensuring that work is ready for inspection, or by the job superintendent.
▪ Cutoff Time: Inspections requested by 4:00 PM on a business day will be scheduled for the next business day. Future dates may also be requested, up to a week in advance.
Confirmation: You will not receive an email confirmation that your inspection has been scheduled as requested, but you can log into the CSS Portal to verify that it’s on the schedule.
▪ Time Requests: Scheduled inspections are routed geographically, so we don’t make appointments for specific times except in special circumstances, such as early concrete pours.
▪ Contractor on Site: The contractor/job superintendent should be on the job site during inspections. Permits must be posted, and the approved plans must be available to the inspector, or the inspection will fail.
▪ Arrival Time: The inspector is not expected to call contractors to alert them of expected arrival time. It may be done as a courtesy when time allows, but most days they are very busy.
▪ Cancel or Reschedule: You may cancel or reschedule an inspection in the CSS Portal before the 4:00 PM request cut-off time. To cancel on the day of the inspection before 8:30 a.m., call 678/512-3250. After 8:30 a.m., please notify us, but if the inspector is en route to the job site, the inspection will fail (Not Ready), and a re-inspection fee will be charged.
▪ Combo Inspections: For building projects with trade sub-contractors, the General Contractor schedules all inspections. Wall Cover, Ceiling Cover, Rough, and Final are combo inspections.
▪ Final Inspections: Permits must pass all required final inspections. Allowing the permit to expire without passing all inspections or obtaining a required Certificate of Occupancy may result in penalties and or citations.
▪ Optional Inspections: Optional inspections may be available to contractors if the applicable to the project.
▪ Inspection Order: Inspections are listed in the order they are usually performed for the type of permit you hold. Some inspections cannot be scheduled until prerequisite inspections have passed.
▪ Concurrent Inspections: Building, Site, and Fire Marshal inspections may be scheduled for the same day. The Inspectors will not arrive at the same time.
▪ Inspection Results: An Inspection Report is emailed as soon as the inspection result is entered. The inspection results may also be viewed in the CSS Portal by any permit contact, along with any comments. Results are typically entered the same day.
▪ Re-Inspection Fees: Re-inspection fees are charged for all failed inspections. Invoices are sent to the Billing Contact on the permit. They may be viewed and paid on the CSS Portal. Fees must be paid before the next inspection can be scheduled.
For assistance with scheduling inspections, contact the Permit Technicians at 678-512-3250 during business hours. For questions about inspection results, contact the Inspector directly.
Inspections Results
Pass: The work inspected is code compliant.
▪ Partial Pass: At the inspector’s discretion, a Partial Pass result may be given. Typically used for complex commercial projects.
▪ Re-Inspection Required / Non-compliance / In Violation: These results all mean the inspection has Failed. The work inspected is not code compliant. The issues will be noted in the Inspection Report. When all corrections are complete, the inspection may be re-scheduled. Re-inspection fees are charged and must be paid before re-scheduling.
▪ Cancelled: The inspection was cancelled before the cut-off time.
Inspections may fail if the work is not compliant with applicable codes and regulations or is not ready for inspection, the contractor/job superintendent is not on-site, the approved plans are not on-site, the permits are not posted, the inspector does not have access to the job site, or the inspection is canceled after the cut-off time.
How to Request Inspections in the CSS Portal
Note: Case Number = Permit Number = Job ID. These are different names for the same thing.
- Log in to the CSS Portal. Click on My Work, then the Request Inspections tab to select from the list, which displays your available inspections. Locate the permit and the inspection type you would like to request and select it.
2.
Check the box to the left of the Case Number for each inspection you’re requesting. Multiple inspections for multiple properties and/or multiple types of inspections may be requested simultaneously.
3.
Click the blue Request Inspection button.
▪
Click on the Calendar to the Requested Date section’s right and choose the date.
▪
Enter on-site contact name and phone number.
▪
Enter comments: lot number, gate code, special instructions
4.
If scheduling just one inspection, click the Submit button. If scheduling more than one inspection, click the Request All button. A message with a green check mark confirms that the request was completed.
Revisions to Approved Plans
After your permit is issued, you may need to make changes to the Approved Plans. These changes must be submitted as a Revision.
No work not shown on the approved plans may NOT be performed before the revised plans are reviewed and approved and the permit is re-issued. Unrelated work and inspections may proceed while the revision application is being reviewed.
Download the Revision to Issued Permit application form from the City website, fill it out, and upload it to your permit on the CSS Portal. Upload the original approved plans, the revised plans, and any updated supporting documents that the revisions make necessary.
Please note that a Revision Fee will be invoiced. Permit fees may increase if the proposed revisions increase the project valuation. All fees must be paid before the revision application is reviewed.
The review process is the same as for the original permit.
Change of Contractor
The new contractor must be a Registered Contractor whose credentials are current.
The Change of Contractor fee must be paid upon receipt of the invoice, which will be sent to the Applicant. When fees are paid and the permit is re-issued to the new Contractor, work and inspections may resume.
Complete the Change of Contractor form and submit it in the CSS Portal. Select the My Work tab and open the permit.
On the Contractor tab, add both the new contractor and the withdrawn contractor. If the Applicant is the contractor who is withdrawing and does not know who the new contractor will be, then search for and select TBD as the Contractor. The new contractor must be a Registered Contractor whose credentials are current.
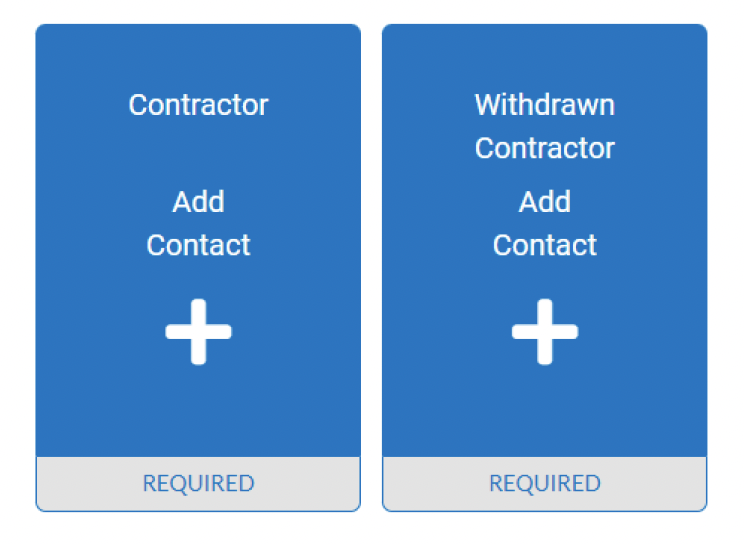
On the Attachments tab, click the Add Attachment card. Use “Related Documents” as the file category for all of the documents. Upload the form and, if applicable, the letter from the Property Owner or Withdrawing Contractor and the notarized Authorized Permit Agent Affidavit and permit agent’s photo ID.
The Change of Contractor fee must be paid upon receipt of the invoice, which will be sent to the Applicant. When fees are paid and the permit is re-issued to the new Contractor, work and inspections may resume.
Permit Extensions and Renewals
Requests may be submitted for:
▪ Extension of a Plan Review – application is abandoned 180 days from initial submittal
▪ Extension of an Issued Building Permit – before the expiration date
▪ Renewal of Expired Permit – after expiration date but within 365 days of issuance
The Building Official will review the request and the reasons for it, as well as the progress of the permit/application, before determining whether to allow the extension or renewal. Extensions and renewals may be granted for periods of up to 30, 60, or 90 days, at the discretion of the Building Official.
Extension and Renewal will be invoiced and must be paid prior to processing the request. Work may not proceed under an expired permit, and no inspections will be performed.
Download the Permit Extension/Renewal Application form and complete the form. Note: vague or incomplete information will delay your request.
Open your permit on the CSS Portal, and click on the Attachments tab. On the Add Attachment card, select “Related Documents” from the drop-down list as the document type. Select the request form from your computer to upload it. Then click the large plus sign.
Certificate of Occupancy
Before a structure may be occupied, a Certificate of Occupancy is required for:
▪ New homes and townhomes
▪ New multi-family buildings
▪ New commercial buildings
▪ Commercial interior alterations
The Building Official may require a Certificate of Occupancy for other projects, such as additions or other occupied structures.
When the permitted work has passed all required Building, Site, and (if commercial) Fire Marshal inspections, download the appropriate Request for Certificate of Occupancy/Completion form (for Commercial or Residential version). Complete the form and upload it to your permit on the CSS Portal. For new residential construction, also upload a Georgia Energy Code Compliance Certificate, signed by the mechanical contractor.
▪ For commercial projects, any Special Inspections Reports must be submitted and approved by the Building Official.
The invoice for the Certificate fee (if not already paid) and any other outstanding fees must be paid before the request will be reviewed.
Allow a minimum of 3 business days for the Building Official to review the request and issue the Certificate of Occupancy. If the permit records are incomplete or there are other issues, the review may take longer. You will be notified when the Certificate has been issued. Commercial Certificates of Occupancy should be posted in a visible place on the premises, usually with the business license.
To submit your certificate request, open your permit on the CSS Portal, and click on the Attachments tab. On the Add Attachment card, select “Related Documents” from the drop-down list as the document type. Select the request form from your computer to upload it. Then click the large plus sign.
Certificate of Completion
An optional Certificate of Completion may be requested for projects not requiring a Certificate of Occupancy. Requests must be submitted within 30 days of passing the required final inspection(s).
Certificates of Completion are not available for any trade permits, except solar panel installations.
When the permitted work has passed all required Building, Site, and (if commercial) Fire Marshal inspections, download the appropriate Request for Certificate of Occupancy/Completion form (for Commercial or Residential version). Complete the form and upload it to your permit on the CSS Portal.
The invoice for the Certificate fee and any other outstanding fees must be paid before the request will be reviewed.
Allow a minimum of 3 business days for the Building Official to review the request and issue the Certificate. If the permit records are incomplete or there are other issues, the review may take longer. You will be notified when the Certificate has been issued.
Download the Permit Extension/Renewal Application form on the City website and complete the form. Note: vague or incomplete information will delay your request.
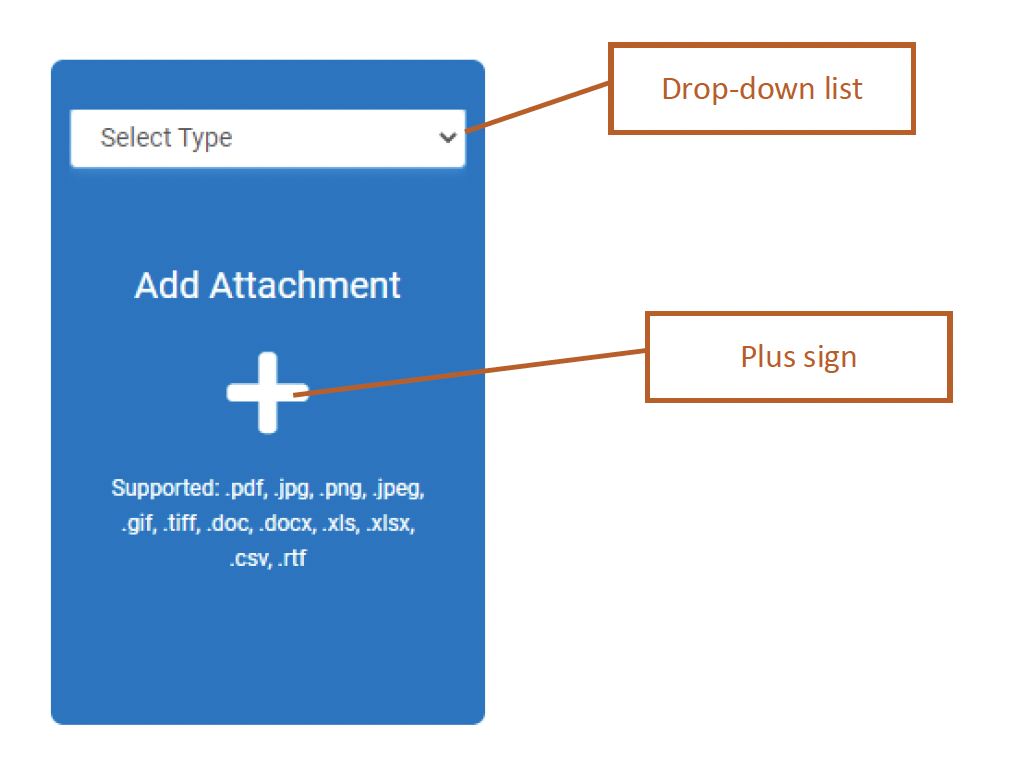
Open your permit on the CSS Portal, and click on the Attachments tab. On the Add Attachment card, select “Related Documents” from the drop-down list as the document type. Select the request form from your computer to upload it. Then click the large plus sign.
